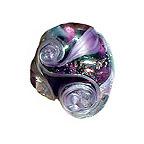
| Beads
have been around since prehistoric times, when humans
first developed tools to drill holes in shells, bones
and other natural objects. The earliest glass beads
are thought to date as far back as 1400 b.c., found
in Egypt. Many cultures have used, worn and traded glass
beads, and they are still prized for their ornamental
and collectible value today.
The
art of beadmaking by winding molten glass around a steel
mandrel is often referred to as "Lampworking".
This is because the early glass beadmakers in Venice
used oil lamps as their heat source for melting the
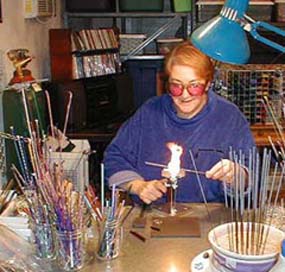
glass. Today, it's more common to use torches, such
as the minor burner I work on, a torch that uses a mix
of propane as the fuel and oxygen as an accelerant,
to get a precise flame that allows me to control the
heat in the glass as it melts.
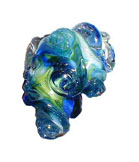
I
will now give you a brief overview of beadmaking, the
tools and methods I use to make my miniature glass bead
sculptures. Hopefully this will give you a greater appreciation
for the lampwork beads you see on this and other websites.
If you are considering taking up beadmaking yourself,
I strongly recommend that you take a class to learn
proper safety issues and technique. The art of making
glass beads is a complicated, but highly satisfying,
and terribly addictive pastime.
Now,
let's get ready to play with fire.........
|
|
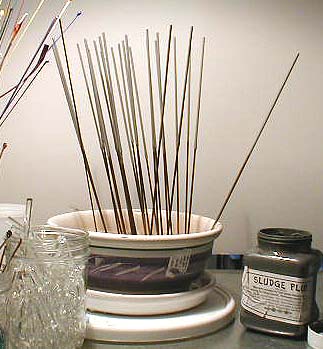
To begin with, let's start with Mandrels.
Mandrels are steel welding rods that have
been cut about 12 inches long. The glass
is wound around the mandrel. But, if you
applied hot glass to them directly, the
glass would stick and never come off.
So, the mandrels are dipped in "Sludge",
a bead release mixture with the consistency
of pancake batter. The dipped mandrels
are then air dried, and ready for beadmaking.
I keep mine in a shallow planter filled
with sand.
After the beads are finished annealing
in the kiln, the whole mandrel is put
in a tub of water to soak, which loosens
the sludge, and the bead can be removed
from the mandrel, leaving a nice even
hole.
Occasionally, the bead release chips
or pulls away from the metal mandrel,
and the molten glass comes in contact
with metal. These beads will never come
off the mandrel, however, they do make
lovely plant pokes. |
|
|
|
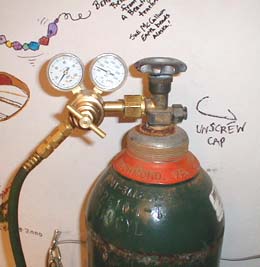
Here's my oxygen tank.
The torch I use is called a minor
burner, and it uses propane as the fuel,
and oxygen as the accelerant, to make
the flame hot enough to melt and work
the glass efficiently.
Perhaps the biggest safety issues in
beadmaking is in the handling of the gas
tanks. You can see the oxygen is chained
securely to the wall. The oxygen is pressurized
in the tank, and if the nozzle were knocked
off, it would take off like a rocket,
so your oxygen tank must always be secured.
The propane tank is stored outside, and
connected by a hose which runs through
a hole in the wall. (Another little surprise
that my husband didn't expect when he
let me use the garage for my studio. )
If the propane tank were to leak inside,
it would pool on the floor, and be a potential
combustion hazard. |
|
|
|
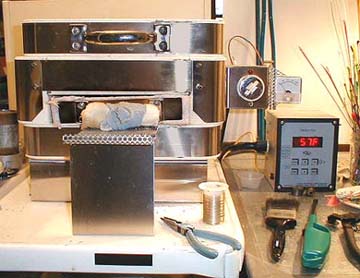
This is the kiln. The
first thing I do when I'm getting ready
to make beads is to turn on my equipment.
I turn on my oxygen and propane tanks and
adjust the pressure, and then I turn on
my kiln. It is set to heat to 940 degrees
and remain there while I work.You can see
the digital controller (with the red read-out)
on the right side which controls the temperature
for me.
This picture shows the kiln with the soft
fiber door in place. This kiln is made by
Arrow Springs just for beadmakers. The soft
door conforms around the ends of the mandrels,
allowing them to stick out, and me not to
have to put my hand all the way in the kiln
with a bead.
|
|
|
|
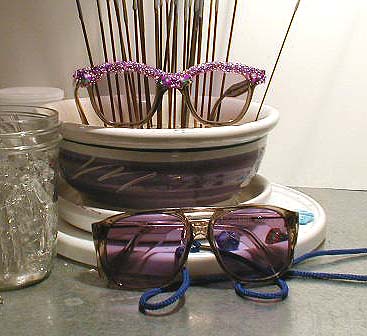
Now, before I turn on
the torch, I'll have you put on a pair of
safety glasses. No, your regular ones won't
do. These special glasses have Rose Didymium
lenses. These allow you to see the glass
in the flame. If you don't wear them, all
you'll see is a big orange ball of sodium
flare. You will probably notice this in
the next couple pictures. Unfortunately,
I don't have a pair that fits my digital
camera !!
Since you're the guest,
you take the nicely beaded pair on top.
I made them just for you !
|
|
|
|
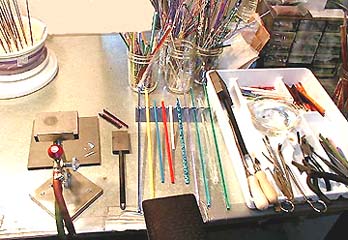
Here is my workbench,
all set up to make beads. On the left
side, you'll see the torch. On the top
of the torch, as well as under it and
the black paddle to the right are all
made of graphite. This helps me shape
the hot glass because it doesn't stick
to graphite.
In the white organizer
are my tools, and a bowl of water used
to cool down hot tools and singed fingers.
My glass rods are lined up in the rod
rest, cleaned and ready to be melted.
Okay, I think we're ready. If you'll just
turn to page two while I light the torch,
we'll make some beads..... |
|
|
|
|